 Pin it
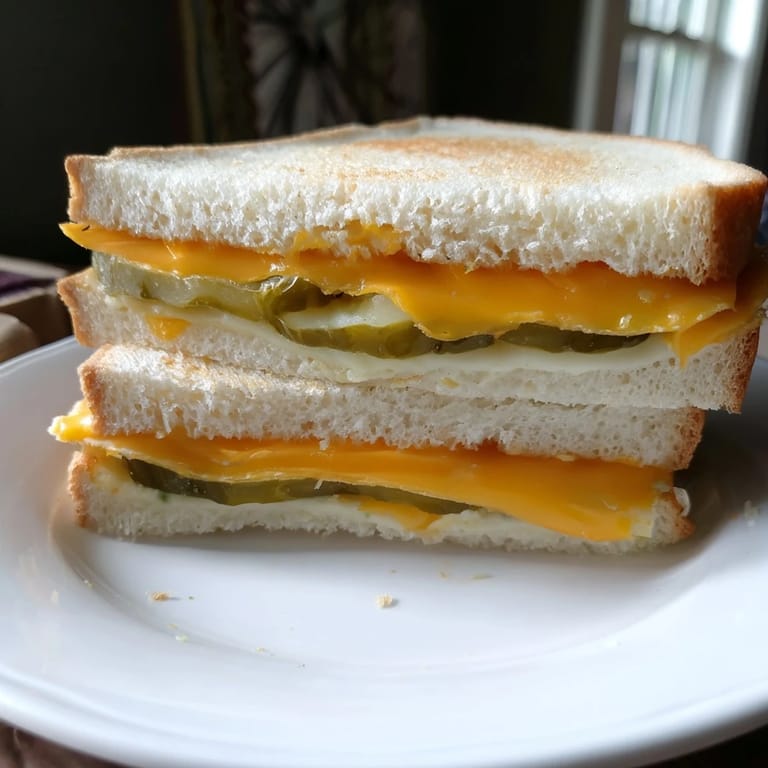
 The first time I made this, I was standing in my kitchen on a lazy Saturday afternoon, staring at a block of sharp cheddar and wondering what I'd do with a jar of crisp dill pickles I'd been meaning to use up. Something clicked—what if the cheese itself became the bread? I laid down those first slices, scattered the pickles on top, covered them with another slice of cheese, and slid the whole thing into the oven. Five minutes in, the kitchen filled with this incredible savory aroma, sharp and tangy all at once. When those cheese buns came out, bubbling and golden at the edges, I knew I'd stumbled onto something genuinely good.
I made this for my partner one weeknight when we were both tired and hungry, and watching their face light up when they bit into it was worth every second. They kept saying it shouldn't work, but somehow it did—that combination of melted cheese and tangy pickle just made complete sense together. Now it's become our go-to when we want something that feels indulgent but isn't fussy, and I've made it at least once a week ever since.
Ingredients
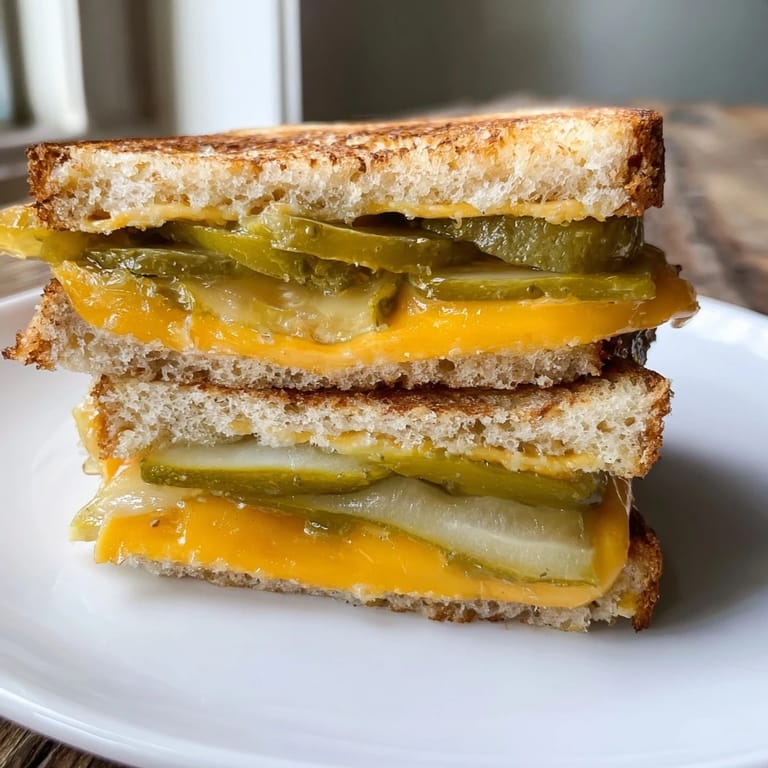
- Sharp Cheddar Cheese (8 slices, ¼ inch thick): The cheese becomes your bread here, so it needs to be thick enough to hold structure when melted—thin slices will fall apart or become too wispy. Sharp cheddar brings a bold flavor that stands up beautifully against the tangy pickles, and it browns gorgeously at the edges when baked.
- Sandwich Pickle Slices (12-14 slices): Long dill pickle slices are essential because they cover the cheese evenly and add that crucial crunch and acidity. Make sure to pat them dry with paper towels—any excess moisture will make your cheese buns soggy and prevent that crispy texture you're after.
- Mayonnaise (2 tablespoons, optional): A thin spread inside the finished sandwich acts as a binder and adds richness without overwhelming the pickle and cheese flavors.
- Dijon Mustard (2 teaspoons, optional): Just a whisper of this adds another layer of tang and sophistication to your sandwich.
- Tomato Slices (2 slices, optional): Fresh tomato brings juiciness and a hint of brightness; add them right before serving so they don't make the bun soggy.
- Deli Turkey or Ham (4 slices, optional): Adds protein and a savory, salty element that complements the cheese and pickle perfectly, though you can absolutely skip this for a vegetarian version.
Tired of Takeout? 🥡
Get 10 meals you can make faster than delivery arrives. Seriously.
One email. No spam. Unsubscribe anytime.
Instructions
- Set up your oven:
- Preheat to 400°F and line your baking sheet with parchment paper or a light spray of nonstick cooking spray. This keeps your cheese buns from sticking and helps them brown evenly.
- Lay down the cheese foundation:
- Arrange four cheddar slices on your sheet, spacing them a few inches apart so the heat circulates around each one. You want a little breathing room for even melting and browning.
- Layer the pickles:
- Take your patted-dry pickle slices and arrange them in a single, overlapping layer on top of each cheese slice, covering as much of the surface as you can. This creates those little pockets of tangy flavor throughout.
- Cap with cheese:
- Place another cheddar slice on top of each pickle layer and press gently—you're sandwiching the pickles between two layers of cheese. Don't press too hard or you'll squeeze out the moisture.
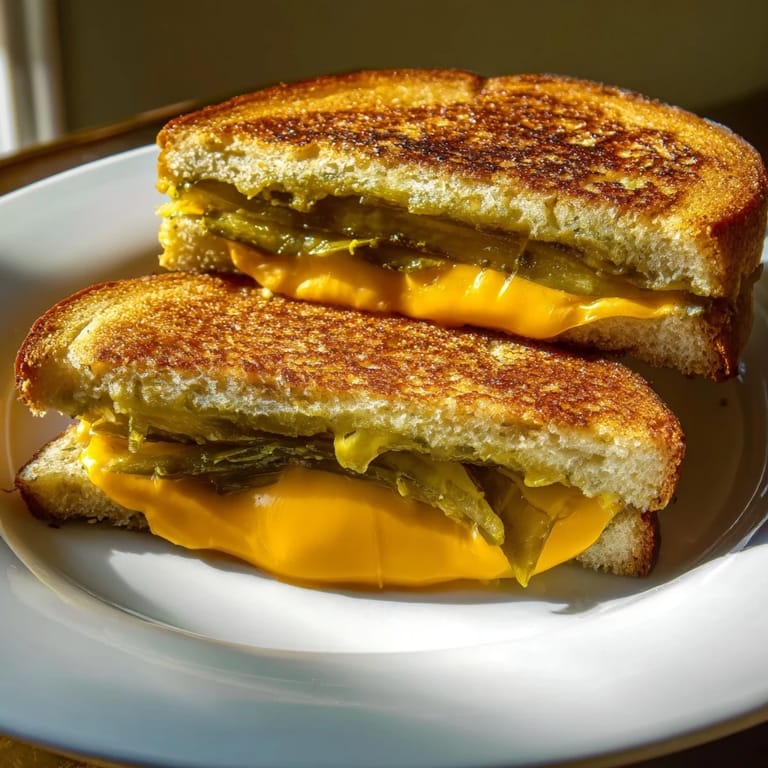
- Bake until golden:
- Slide into the oven for 7 to 8 minutes, watching until the edges are bubbly and the cheese is melted with light golden-brown spots. You want that contrast between the creamy center and the crispy, lacy edges.
- Cool for structure:
- Let the buns rest on the baking sheet for about 5 minutes—this gives the cheese time to firm up just enough to handle without falling apart. They'll still be warm, which is exactly what you want.
- Build your sandwich:
- If you're using any fillings, spread a thin layer of mayo and mustard on the inside of each warm cheese bun. Add your tomato slices and meat if desired, keeping layers thin so the sandwich doesn't become unwieldy.
- Assemble and serve:
- Carefully press the two cheese-pickle buns together, sandwich-style, and eat immediately while everything is still warm and crispy. This is not a sandwich that improves with waiting.
 Pin it
 There was this moment when my sister tried one and realized she could eat something this satisfying without guilt, and it genuinely changed how she thought about low-carb eating. That's when I understood this recipe isn't just about the combination of flavors—it's about the feeling of having something that's both indulgent and light, crunchy and rich all at once.
Why the Cheese-Pickle Combination Works
Sharp cheddar and tangy pickles are a naturally complementary pair—the bold, slightly salty cheese amplifies the brightness of the dill, creating this beautiful back-and-forth on your palate. When you melt the cheese and toast it until the edges brown, you add another layer of complexity that transforms what could be a simple snack into something genuinely crave-worthy. I've found that the key is not overthinking it; the three main elements—cheese, pickles, and heat—do all the heavy lifting, which is why this works so well despite its unusual simplicity.
Customization Ideas That Actually Work
Once you understand the core formula, you can play with it in ways that make sense. I've tried Swiss cheese for a milder, slightly sweet note, and provolone for something earthier and more assertive. For heat lovers, hot pickles or thin jalapeño slices nested between the cheese layers add a kick that doesn't overpower the original flavors. The beauty is that the cheese bun structure is sturdy enough to handle additions without falling apart—just remember that anything wet should be patted dry first, and anything too heavy might need a gentle hand when assembling.
- Try adding a small handful of shredded lettuce between the cheese buns for extra crunch and freshness.
- Experiment with different pickle varieties—bread-and-butter pickles bring sweetness, spicy pickles add heat, and half-sour pickles offer a middle ground.
- For a gourmet touch, spread a thin layer of whole-grain mustard instead of Dijon, or add a slice of prosciutto for richness and saltiness.
Storage and Reheating Tips
These are absolutely best eaten fresh and warm, but I know life happens and sometimes you have leftovers. Store them in an airtight container in the refrigerator for up to two days, though they'll lose some of that initial crispness. To bring them back to life, warm them gently in a toaster oven at 350°F for a few minutes—this restores the crispy edges without drying out the cheese center, and you'll get that fresh-made feeling back.
 Pin it
 There's something deeply satisfying about a recipe this simple delivering this much joy, and I hope it becomes one of those dishes you find yourself making again and again. It's honest food—just good ingredients working in harmony—and that's all you really need.
Recipe FAQs
- → How do the cheddar cheese buns hold together?
The sharp cheddar slices melt and fuse in the oven, creating firm, crispy buns that hold the pickles securely.
- → Can I use different cheese types for this sandwich?
Yes, Swiss or provolone can be substituted to vary the flavor profile while maintaining the bun structure.
- → What is the best way to prepare the pickles for layering?
Use long dill pickle slices that are well drained and patted dry to prevent sogginess.
- → How can I add more crunch to the sandwich?
Adding shredded lettuce or spicy pickled jalapeños can enhance crunch and add freshness or heat.
- → Is this sandwich suitable for a low-carb diet?
Yes, replacing bread with cheddar cheese buns significantly reduces carbohydrates, fitting well into low-carb eating plans.
- → How should the sandwich be served for best texture?
Serve immediately while the cheese buns are warm and crispy for optimal texture and flavor.