 Pin it
 My kitchen counter was covered in flour dust, and I was frantically trying to figure out how to make Thanksgiving memorable without serving the same roasted bird everyone expected. That's when I spotted my sourdough starter bubbling away in its jar and thought, why not shape the bread like a turkey instead? The idea seemed ridiculous at first, but once I started folding and shaping the dough into feathers and a plump little body, I couldn't stop smiling. It turned out to be the star of the table, and no one even missed the meat.
I'll never forget the first time I brought this loaf to a potluck and watched my friend's six year old squeal with delight when she saw it. She insisted on taking a photo with the bread turkey before we could slice it, and her mom later told me she talked about it for weeks. That's when I realized this recipe wasn't just about baking, it was about creating a moment people remember long after the crumbs are swept away.
Ingredients
- Bread flour: The higher protein content gives this loaf structure and chew, which is essential when you're shaping something as detailed as a turkey.
- Water: Room temperature water keeps your fermentation steady and predictable, so don't use cold tap water straight from the fridge.
- Active sourdough starter: Make sure it's bubbly and has doubled in size before you use it, or your dough won't rise properly.
- Fine sea salt: It strengthens the gluten and balances the tanginess, and I've found fine salt dissolves more evenly than coarse.
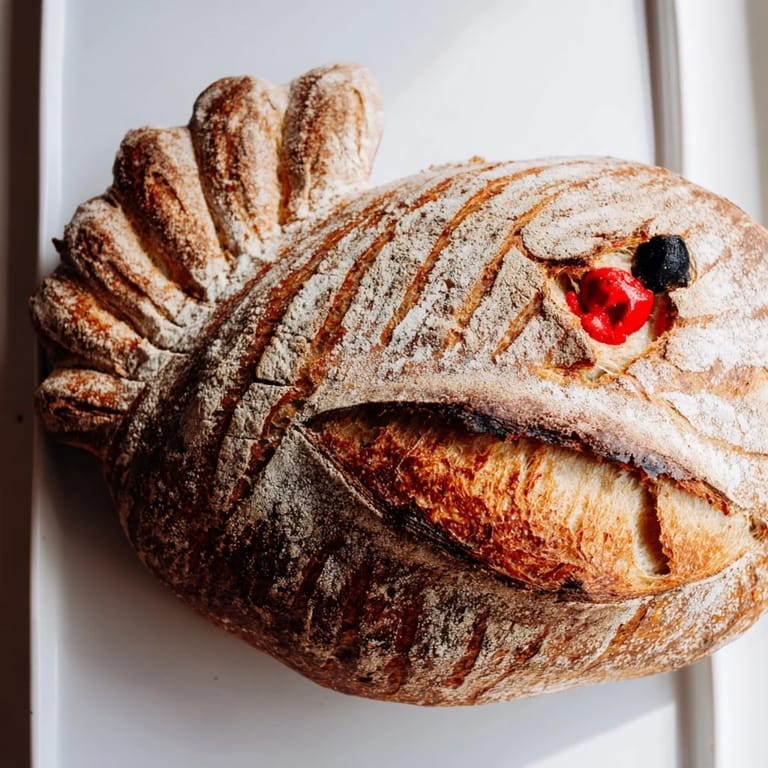
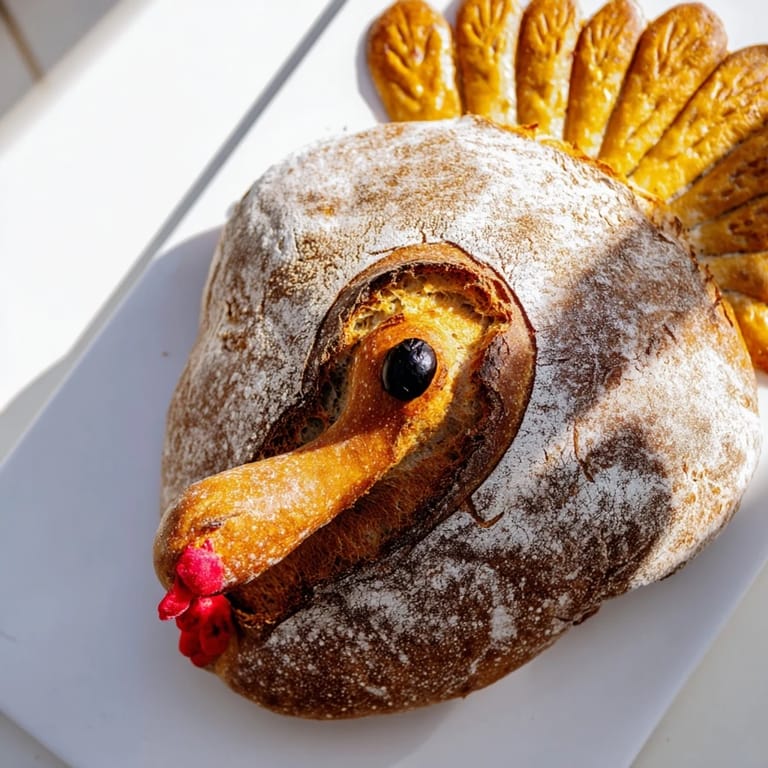
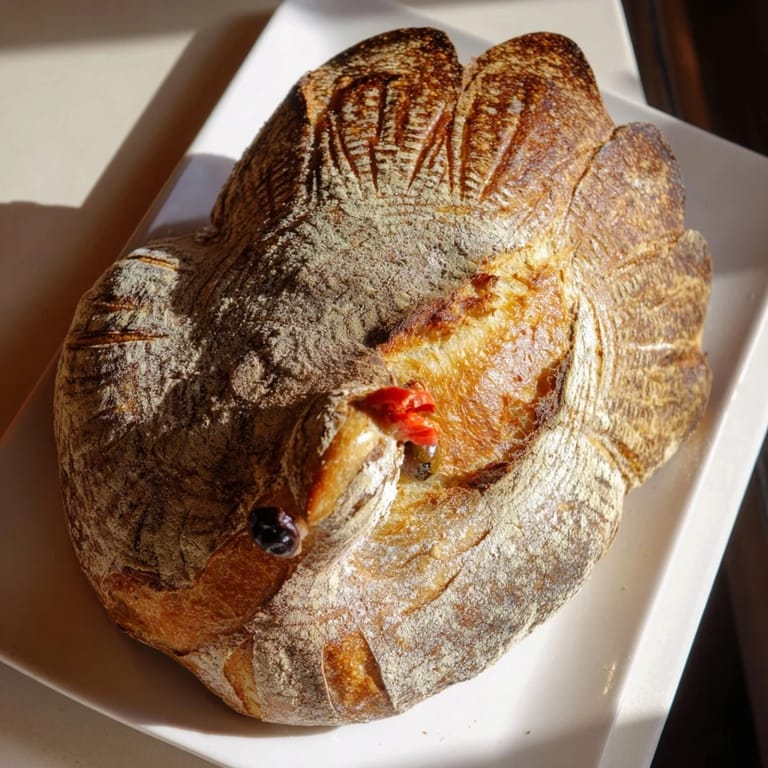
- Black olives or peppercorns: These become the turkey's eyes, and I prefer olives because they're easier to press into the dough without rolling away.
- Red bell pepper or dough: A tiny piece of pepper makes a vibrant wattle, though you can also dye a bit of dough with paprika if you're feeling fancy.
- Egg: Brushing this on before baking gives the loaf a gorgeous golden sheen, but skip it if you're keeping things vegan.
- Seeds: Poppy, sesame, or flax seeds add texture and visual interest to the feathers, making each one look distinct.
Tired of Takeout? 🥡
Get 10 meals you can make faster than delivery arrives. Seriously.
One email. No spam. Unsubscribe anytime.
Instructions
- Mix and Rest:
- Combine the flour and water in a large bowl until no dry patches remain, then cover it with a damp towel and let it sit for 30 to 45 minutes. This autolyse step lets the flour fully hydrate and makes the dough easier to work with later.
- Add Starter and Salt:
- Squish the sourdough starter and salt into the dough with your hands, pinching and folding until everything is evenly distributed. It'll feel sticky and shaggy at first, but trust the process.
- Stretch and Fold:
- Every 30 minutes for the next 2 hours, wet your hands and gently stretch one side of the dough up and fold it over itself, then rotate the bowl and repeat. You'll feel the dough tighten and become smoother with each set.
- Bulk Ferment:
- Cover the bowl and let the dough rise at room temperature for 5 to 7 hours until it's doubled in size and full of bubbles. The timing depends on your kitchen's warmth, so watch the dough, not the clock.
- Shape the Turkey:
- Turn the dough onto a floured surface and divide it into pieces: one large oval for the body, a smaller round for the head, and several teardrop shapes for the tail feathers and wings. Use a light touch so you don't deflate all that beautiful fermentation.
- Assemble on Parchment:
- Arrange the body oval in the center of parchment paper, then dab a little water on the edge and press the head into place. Fan out the feathers behind the body and tuck the wings alongside, then score feather details with a sharp knife.
- Add the Face:
- Press olive pieces or peppercorns gently into the head for eyes, and nestle a small piece of red pepper or dyed dough underneath for the wattle. This is where the turkey really comes to life.
- Proof:
- Cover the assembled loaf loosely with a towel and let it rest for 1 to 2 hours until it looks slightly puffy but not doubled. If you poke it gently, the dough should spring back slowly.
- Preheat the Oven:
- Set your oven to 230°C (450°F) and place a baking stone or steel inside to heat for at least 30 minutes. A properly preheated stone gives you that crispy, bakery style crust.
- Egg Wash and Seeds:
- If you're using egg wash, brush it gently over the entire loaf, then sprinkle seeds onto the feathers for texture. You can skip this step entirely if you prefer a matte, rustic finish.
- Bake with Steam:
- Slide the parchment with the loaf onto the hot stone, then toss a few ice cubes into a pan on the oven floor to create steam. Bake for 20 minutes, then lower the heat to 200°C (400°F) and bake another 20 minutes until deeply golden.
- Cool Completely:
- Transfer the loaf to a wire rack and let it cool for at least an hour before slicing. Cutting too early releases all the steam and leaves you with a gummy interior.
 Pin it
 The best part of this recipe isn't the baking, it's watching people's faces light up when they see it. Last year, my neighbor brought her kids over just to watch me score the feathers, and we ended up making two loaves so they could help shape one themselves. By the time we pulled them from the oven, the whole house smelled like a bakery, and the kids were already planning what animal to try next.
Getting the Shape Just Right
Shaping a turkey loaf is more forgiving than you think, because imperfections actually add character. I used to stress about making every feather identical until I realized that real turkeys are a little lopsided too. If a wing droops or a feather tilts, just roll with it and call it rustic charm. The key is working quickly so the dough doesn't warm up too much in your hands.
Flavor Variations to Try
I've stirred chopped rosemary and thyme into the dough before shaping, and it gave the bread a savory, Thanksgiving stuffing vibe that people couldn't get enough of. You could also fold in some dried cranberries for a subtle sweetness, or brush the crust with garlic butter right after baking. Each variation makes the loaf feel like a completely different experience, so don't be afraid to experiment.
Serving and Storage
This bread is meant to be the centerpiece, so place it on a wooden board surrounded by small bowls of butter, olive oil, or jam. Once everyone's had their fill of photos, slice it at the table so people can tear into the warm, tangy crumb together. Leftovers keep well wrapped in a linen towel for two days, and day old slices make incredible toast or croutons.
- Store at room temperature in a bread box or linen towel, never in plastic.
- Freeze slices in a sealed bag for up to three months and toast them straight from frozen.
- Reheat the whole loaf in a 180°C (350°F) oven for 10 minutes to revive the crust.
 Pin it
 This loaf has a way of turning a simple meal into a celebration, and I hope it does the same for your table. Happy baking, and don't forget to snap a photo before everyone digs in.
Recipe FAQs
- → How long does the fermentation process take?
The total fermentation spans 10–12 hours, including a 30–45 minute autolyse, 2 hours of stretch and folds, 5–7 hours bulk fermentation, and 1–2 hours final proof. This extended timeline develops the sourdough's characteristic tangy flavor.
- → Can I prepare this ahead for a holiday gathering?
Yes. Shape the loaf the evening before, then refrigerate overnight for cold fermentation. This also slows yeast activity and improves flavor. Bake directly from cold, adding 5–10 minutes to baking time.
- → What's the difference between stretch and folds and traditional kneading?
Stretch and folds gently build gluten structure while keeping the dough relaxed, developing better extensibility. Unlike vigorous kneading, this method creates a more open crumb and requires less physical effort.
- → How do I achieve the crusty exterior?
Preheat a baking stone thoroughly and bake with steam for the first 20 minutes. Steam keeps the surface moist, allowing maximum expansion before crust formation. The stone conducts heat efficiently for deep browning.
- → Can I use commercial yeast instead of sourdough starter?
While possible, sourdough starter creates superior tang and complexity. If substituting, use instant yeast at ¼ teaspoon, though you'll sacrifice the distinctive sourdough character and may need to adjust fermentation timing.
- → What temperature is ideal for bulk fermentation?
Aim for 21–23°C (70–74°F). Cooler temperatures slow fermentation, creating deeper flavor through extended fermentation. Warmer environments accelerate activity, requiring closer monitoring to prevent overproofing.