 Pin it
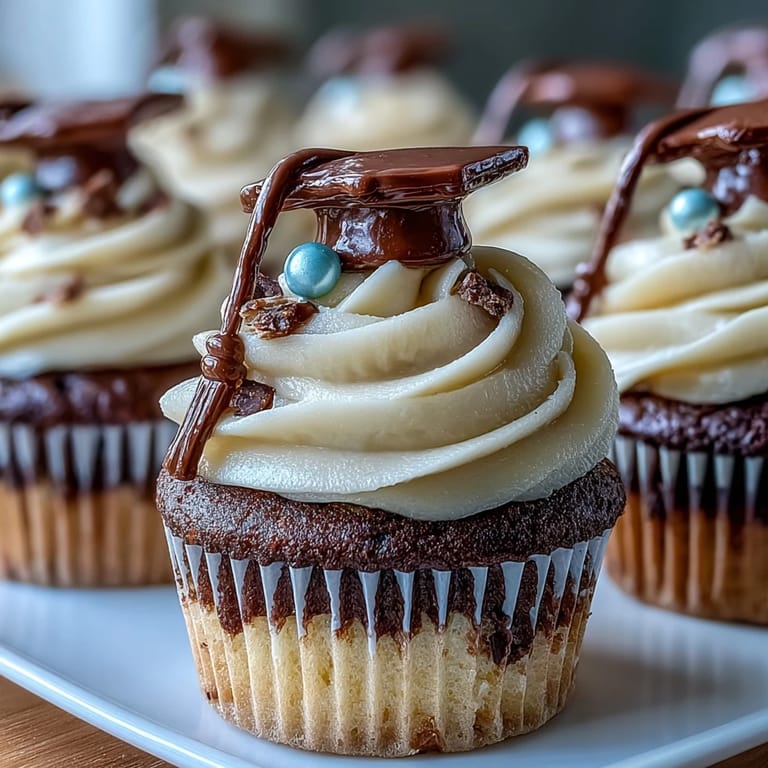
 My cousin texted me three weeks before her graduation asking if I could bring something to her party, and I found myself at the kitchen counter at 11 PM scrolling through decoration ideas instead of sleeping. The moment I saw graduation cap toppers made from candy, I knew exactly what I wanted to make—something that felt celebratory but wouldn't stress me out the morning of the event. These cupcakes came together like a promise I could actually keep: soft, buttery, and topped with these ridiculous little candy mortarboards that somehow made everything feel more real. There's something about baking for milestones that changes how you approach a recipe.
I'll never forget watching my cousin take the first bite of her cupcake at the party, cap and all, frosting on her nose, laughing with her friends gathered around the dessert table. Someone snapped a photo and it became the one thing everyone remembered from that day besides the ceremony itself—not because the cupcakes were fancy, but because they tasted like someone cared enough to make something special, something just a little bit ridiculous in the best way.
Ingredients
- All-purpose flour: Use the spoon-and-level method rather than scooping straight from the bag, because overpacking flour is the quickest way to get dry, dense cupcakes that disappoint you halfway through frosting.
- Granulated sugar: This is your base for tender crumb, so don't skimp on creaming it properly with the butter—that's where the fluffiness comes from.
- Unsalted butter: Softened butter mixed with sugar creates thousands of tiny air pockets that make cupcakes light, so let it sit on the counter for at least 30 minutes before you start.
- Eggs: Room temperature eggs blend more smoothly into the batter and create better texture—pull them out of the fridge while your oven preheats.
- Whole milk: This adds moisture and tenderness that all-in-one dry mixes can't quite replicate.
- Baking powder: The leavening agent that gives you rise, so make sure yours isn't sitting in your cabinet from last year looking dusty.
- Pure vanilla extract: The real stuff tastes like actual vanilla, and you'll notice the difference in flavor depth compared to imitation.
- Powdered sugar for frosting: Sift it first even though it feels like an extra step—it breaks up any lumps that'll make your frosting grainy and unpleasant to spread.
- Mini peanut butter cups: These become the base of your graduation cap, so choose quality ones that taste good eaten straight from the wrapper.
- Chocolate square candies: These form the mortarboard part of the cap and need to be sturdy enough to hold the peanut butter cup without bending.
- String licorice or sour candy strips: These are your tassels and they should be flexible enough to hang naturally without snapping when you handle them.
- Mini M&Ms or candy pearls: The tiny detail that makes each cap look intentional—don't skip this because small things matter.
Tired of Takeout? 🥡
Get 10 meals you can make faster than delivery arrives. Seriously.
One email. No spam. Unsubscribe anytime.
Instructions
- Prepare your workspace:
- Line your muffin tin with paper liners and preheat the oven to 350°F—this gives your oven time to reach true temperature while you're mixing, and it prevents that sudden heat shock when you open the door.
- Cream butter and sugar:
- Beat them together for about 3 minutes until the mixture looks pale and fluffy, like whipped clouds—this is where all your lift comes from. Add eggs one at a time, letting each one fully incorporate before adding the next, then mix in vanilla and you'll smell that sweet vanilla moment fill your kitchen.
- Combine dry ingredients:
- Whisk flour, baking powder, and salt in a separate bowl so the baking powder distributes evenly and you don't end up with pockets of metallic taste. This dry mixture is going to be added in stages, which keeps your batter from becoming overdeveloped and tough.
- Alternate and fold:
- Add half the dry mixture, stir, then add milk, then the rest of the dry ingredients—this alternating method prevents overmixing and keeps your cupcakes tender. Stop mixing the moment you don't see dry streaks of flour, because those extra 10 seconds of stirring can make the difference between soft and dense.
- Fill and bake:
- Divide batter evenly using a small cookie scoop or spoon, filling each liner about two-thirds full. Bake for 18 to 20 minutes, checking at 18 with a toothpick—it should come out clean or with just a few moist crumbs clinging to it, and your kitchen will smell absolutely incredible.
- Cool completely:
- Let cupcakes sit in the pan for 5 minutes, then transfer to a wire rack and let them cool all the way down before frosting—warm cupcakes will melt your buttercream into a puddle.
- Make the buttercream:
- Beat softened butter until it's smooth and pale, then gradually add powdered sugar a little at a time so it doesn't poof into the air. Add milk, vanilla, and salt, then beat for another minute until it's fluffy and spreadable—taste it and adjust vanilla or salt if you need to.
- Frost with intention:
- Use a spatula or piping bag to create swirls on top of each cooled cupcake, making peaks and valleys where the frosting catches the light. This is where your cupcakes start to look like something worth celebrating.
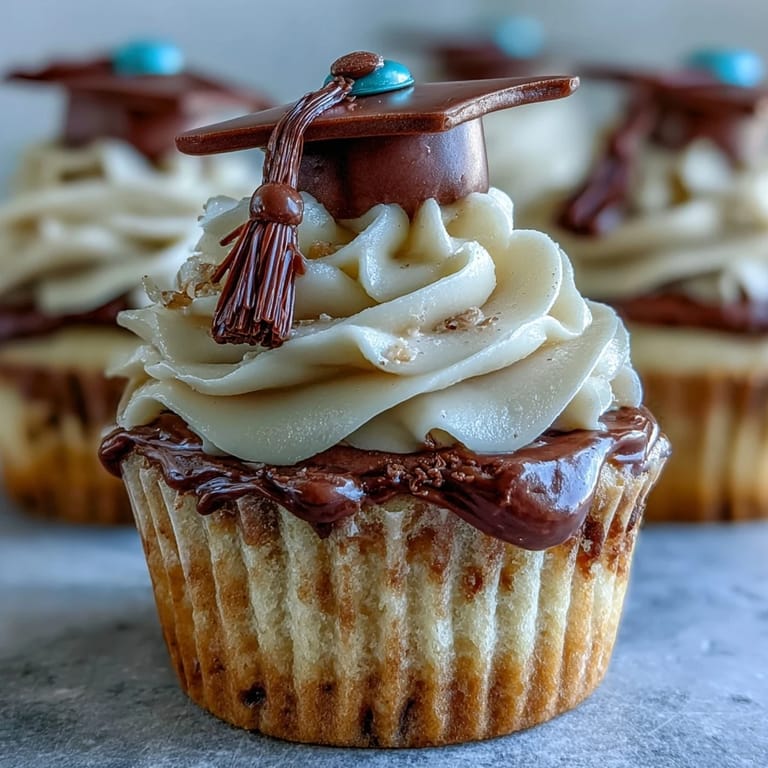
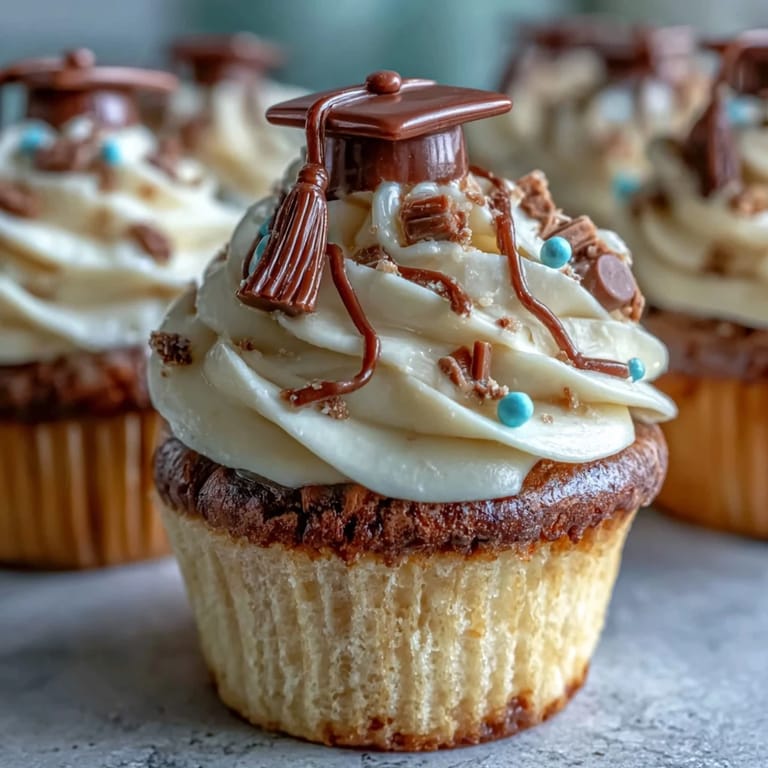
- Assemble the graduation caps:
- Place a chocolate square flat-side up on a clean surface, then use a tiny dab of melted chocolate or frosting to secure an upside-down mini peanut butter cup in the center. This is fiddly work but oddly satisfying, like adult craft time, and you'll develop a rhythm after the first few.
- Add tassel and button:
- Attach a piece of licorice or candy strip as the tassel and a mini M&M or pearl as the button using more dabs of chocolate or frosting—let these set for a few minutes before placing on cupcakes so they don't slide around.
- Crown your cupcakes:
- Once the caps have set, carefully place one on top of each frosted cupcake, pressing gently so it sits securely but not so hard that frosting squishes out the sides.
 Pin it
 There's a moment when you finish placing that last cap on the last cupcake and you step back and see these dozen little edible mortarboards lined up in front of you, and you realize you've made something that's genuinely thoughtful. It's not just dessert—it's a tiny celebration of an accomplishment, baked from scratch and decorated with actual care, the kind of thing that reminds people they matter enough for someone to spend time in the kitchen.
Storage and Make-Ahead Options
You can bake these cupcakes up to two days before your event and store them in an airtight container at room temperature, which takes so much pressure off the day itself. I usually frost them the morning of and assemble the caps about 2 hours before serving so they're fresh-looking and stable. If you're making them further in advance, freeze the baked, unfrosted cupcakes in a freezer bag for up to two weeks, then thaw them overnight on the counter before frosting and topping.
Customization for School Colors
The beauty of these cupcakes is how easily you can personalize them for any school's color scheme. Mix a tiny drop of gel food coloring into your buttercream frosting to match school colors, or choose candies that coordinate—gold and purple, blue and white, red and white, whatever the graduate's school happens to be. You could even layer different colored frosting if you're feeling adventurous, creating a striped effect that looks way more complicated than it actually is.
Nut-Free and Allergy-Friendly Adaptations
If you're serving these at a party where allergies matter, you have options without losing the spirit of the design. Swap peanut butter cups for additional chocolate candies or mini candy bars, check all your candy labels for cross-contamination warnings, and label which cupcakes contain what so people can make informed choices. The cap topper still works with these substitutions and nobody will feel left out at dessert time.
- Always read candy labels carefully because some are processed in facilities that handle nuts even if the candy itself doesn't contain them.
- You can also skip the peanut butter cups entirely and use a second layer of chocolate squares to create a thicker, sturdier mortarboard.
- When in doubt, ask about allergies ahead of time so you can feel confident serving these to people you care about.
 Pin it
 Making these cupcakes turned out to be less about the baking and more about marking a moment that mattered, and that's the whole reason to do it. Celebrate generously, frost messily, and watch people's faces when they realize those little caps are edible.
Recipe FAQs
- → How do I make the cap toppers stay in place?
Use a small amount of melted chocolate or frosting to attach the peanut butter cup to the chocolate square and secure the licorice tassel and candy button on top for stability.
- → Can I make these cupcakes nut-free?
Yes, substitute the mini peanut butter cups with chocolate squares to avoid nut allergens while keeping the same festive look.
- → What is the best way to store the cupcakes?
Keep the cupcakes in an airtight container at room temperature for up to two days to maintain freshness and texture.
- → Can I add color to the frosting?
Absolutely, adding food coloring to the buttercream is a great way to customize cupcakes to match school colors or party themes.
- → How long does it take to prepare and bake?
Preparation takes about 25 minutes, and baking requires roughly 20 minutes, totaling around 45 minutes before decorating.